The ACME Guide: 64-bit Ubuntu 8.04 LTS Hardy Heron Edition - Part 2
Posted on June 9, 2008
Since ColdFusion 6, it’s been possible to run on 64-bit systems with 64-bit JVMs, just not officially. (If you’re nice, I’ll post how later.) 64-bit support was officially introduced for ColdFusion with version 8, but only for Solaris SPARC. As of the 8.0.1 release, Adobe gave us offical support for 64-bit on Windows, Linux and OSX.
ColdFusion 8.0.1 with support for 64-bit JVM
Manjukiran Pacchhipulusu from Adobe posted Taking advantage of 64-bit support in ColdFusion 8 on the ColdFusion Development Center.
One of the best benefits of moving to a 64-bit system is the amount of memory that they can handle. From the article,
“32-bit microprocessors can directly address a maximum of 232 ~= 4 GB of memory, while 64-bit microprocessors have pushed this limit further and can directly address up to a maximum of 264 bytes = ~16 Exabytes = ~17.2 billion GB of physical memory. Practically speaking, this means that applications running on a 64-bit microprocessors have unlimited memory available to them. However, most of the 64-bit systems and operating systems available today pose a limit on the amount of RAM that they can recognize; for instance, Apple Mac Pro can recognize up to 32GB of memory, while Windows 2008 64-bit Enterprise can utilize 2TB of memory–both are still an incredible amount of memory.”
Check out the article for benchmarks comparing the performance of 32-bit vs. 64-bit ColdFusion 8.0.1 Enterprise.
Preparing to install ColdFusion
You can download ColdFusion here. As of 8.0.1, there are separate installers for the 32-bit and 64-bit versions. For Linux, the 64-bit installer is named coldfusion-801-lin64.bin.
amoreno@amoreno-desktop:~/downloads$ ls -l
total 613940
-rw-r--r-- 1 amoreno amoreno    178165 2008-06-02 22:51 cf801install.pdf
-rw-r--r-- 1 amoreno amoreno 478222426 2008-06-05 00:32 coldfusion-801-lin64.bin
User and File permissions in Linux
In order to run the installer, you have to be logged in as the root user and the .bin file has to have permission to execute. Like we did with Apache, we’ll passively log in as root using the sudo command and use chmod to change the installer’s file permissions so it can be executed.
amoreno@amoreno-desktop:~/downloads$ sudo chmod 777 coldfusion-801-lin64.bin
[sudo] password for amoreno:
amoreno@amoreno-desktop:~/downloads$ ls -l
total 613940
-rw-r--r-- 1 amoreno amoreno    178165 2008-06-02 22:51 cf801install.pdf
-rwxrwxrwx 1 amoreno amoreno 478222426 2008-06-05 00:32 coldfusion-801-lin64.bin
If you look at the group of letters to the far left of the filename, you’ll see that they’ve changed from -rw-r--r-- to -rwxrwxrwx. These represent file (or folder) permissions: [r]ead, [w]rite, e[x]ecute. You can (and should) read more here.
File, folder and user permissions are extremely important when doing anything in Linux. For example, if you’re having problems with CFFILE or CFDIRECTORY in Linux, odds are you don’t have the correct permissions set.
Ok, so we’ve told Linux that the .bin file can be executed, before we can run the installer, we need to create an account specifically for the ColdFusion server.
ColdFusion Server Group and User accounts
The ColdFusion installer by default expects a user group and account named “nobody”. For those of you new to CF on Linux, let’s use a name that makes more sense.
Create the ColdFusion Group
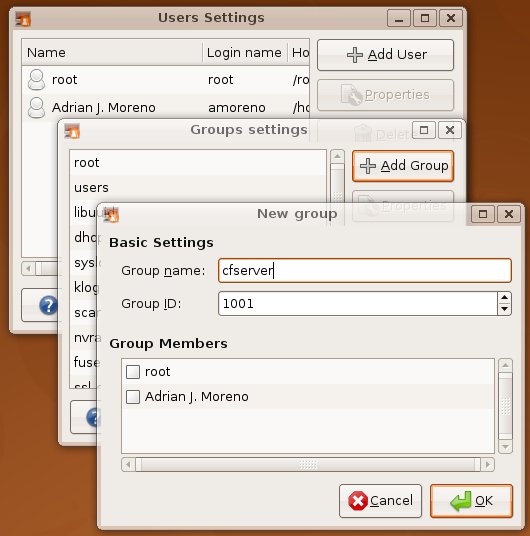
In the top menu, go to System > Administration > Users and Groups. Click on “Unlock” and enter your password to continue. Now that you’ve Unlocked this panel, click on “Manager Groups”, then “Add Group”. Create a Group named cfserver and click “Ok”.

Now close the Groups Settings dialog. You should be back on the Users Settings dialog. Click “Add User”.
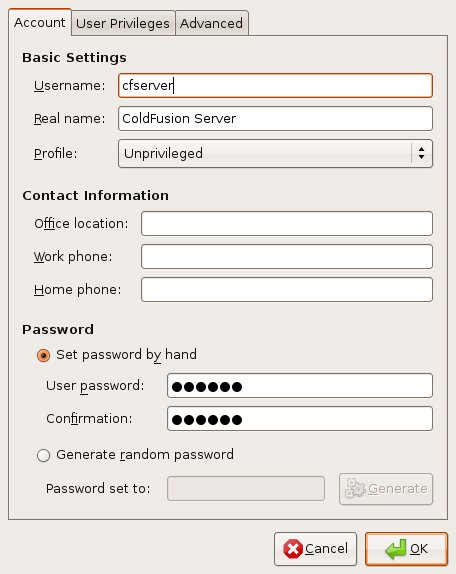
In the “Account” tab, enter the username cfserver, the Real name ColdFusion Server and set the Profile to “Unprivileged”. Create a password that you’ll remember.

By choosing “Unprivileged”, all the options in the “User Privileges” tab will be deselected.
Go to the “Advanced” tab and you’ll see that the home directory for this user account has been set to /home/cfserver. Choose the Main group cfserver. Leave the Shell and User ID fields to their default values. Click “OK” to create the user.

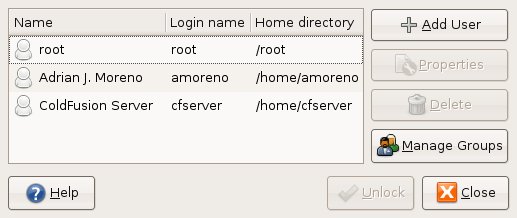
You should be back at the Users Settings dialog.

If the ColdFusion Server account is now in your list, you’re ready to install ColdFusion.
Installing ColdFusion
We’re 99% ready to install ColdFusion. Before we can go any futher, we need to download a C++ library that is needed by ColdFusion 8 and is not installed in Ubuntu by default.
libstdc++.so.5
Thanks to Dave Shuck for posting about this. You can get this library through the Synaptic Package Manager, just like you got Apache earlier. In the top navigation, go to System > Administration > Synaptic Package Manager. Enter your password and Search for “libstdc++5”. When you mark it for installation, you’ll be prompted to installed a related library.
Alternately, you can get it via the command line as Dave did:
$ sudo apt-get install libstdc++5
Once the library is installed, we’re 100% ready to go.
FINALLY we can install ColdFusion
At the command line, go to the folder where you downloaded the installation file. Make sure you use the sudo command when you run the installer as you have to be root to install ColdFusion.
If you run into any problems, you can type “quit” at any prompt throughout the installation process.
amoreno@amoreno-desktop:~/downloads$ sudo ./coldfusion-801-lin64.bin
[sudo] password for amoreno:
Preparing to install...
Extracting the JRE from the installer archive...
Unpacking the JRE...
Extracting the installation resources from the installer archive...
Configuring the installer for this system's environment...

Launching installer...

Preparing CONSOLE Mode Installation...

===============================================================================
Choose Locale...
----------------

  ->1- English

CHOOSE LOCALE BY NUMBER:
Well, you’ve only got one choice here.
CHOOSE LOCALE BY NUMBER: 1
===============================================================================
Adobe ColdFusion 8                (created with InstallAnywhere by Macrovision)
-------------------------------------------------------------------------------
===============================================================================
Introduction
------------

Welcome to the Installation Wizard for Adobe ColdFusion 8
Yadda, yadda, yadda.
WARNING: This program is protected by copyright laws and international
treaties.

PRESS <ENTER> TO CONTINUE:
Press Enter.
===============================================================================
License Agreement
-----------------

Installation and Use of Adobe ColdFusion 8 Requires Acceptance of the Following License Agreement:
Blah, blah, blah.
10: PRESS <ENTER> TO CONTINUE:
20: DISPLAY PAGE OF LICENSE AGREEMENT
30: GOTO 10
And then one day,
DO YOU ACCEPT THE TERMS OF THIS LICENSE AGREEMENT? (Y/N): Y
If you didn’t run the installer as root using sudo or if you didn’t install the C++ library, you’ll hit a brick wall right here. Otherwise . .
===============================================================================
Install Type
------------

If you do not have a serial number, select either 30-day trial or Developer
Edition.

  ->1- Install new version of Adobe ColdFusion 8 with a serial number
    2- 30-day trial
    3- Developer Edition

Installation Choice:
Choose 3 to install the full version of ColdFusion Enterprise for your local machine.
===============================================================================
Installer Configuration
-----------------------

What kind of installation do you want?

  ->1- Server configuration
    2- Multiserver configuration
    3- J2EE configuration (EAR file)
    4- J2EE configuration (WAR file)

Choose one of the following options::
Option 1 will suit most users. Multiserver configuration has support for clustering and allows you to create multiple instances of CF on a single computer.
You only need option 3 or 4 if you’re going to deploy CF on a J2EE server like JBoss or WebLogic.
We’re going to go with Option 1.
===============================================================================
Is Adobe ColdFusion 8 (Server Configuration) Installed?
-------------------------------------------------------

You cannot install the server configuration of Adobe ColdFusion 8 if it is already installed on this computer.

Is there already a server configuration of Adobe ColdFusion 8 installed?

    1- Yes
  ->2- No

ENTER THE NUMBER FOR YOUR CHOICE, OR PRESS <ENTER> TO ACCEPT THE DEFAULT:
Choose 2 (right?)
===============================================================================
Subcomponent installation
-------------------------

The following options are available for installation.

An option marked with "[X]" in front will be installed and an option with "[ ]"
will not.  Choosing an option will toggle it on or off

[X] 1) ColdFusion 8 Documentation
[X] 2) Adobe LiveCycle Data Services ES
[X] 3) ColdFusion 8 Search Services
[X] 4) Start ColdFusion on system init

    1) Continue with installation


Select an option:
If you don’t want ColdFusion to start when you log in every time, deselect 4. I’ll show you how to start and stop CF manually later.
I chose 4, then 5 to continue.
===============================================================================
Choose Install Folder
---------------------

Select the directory where you want to install Adobe ColdFusion 8.

Directory:

  Default Install Folder: /opt/coldfusion8

ENTER AN ABSOLUTE PATH, OR PRESS <ENTER> TO ACCEPT THE DEFAULT
Accept the default path.
If you chose to install Adobe LiveCycle Data Services, you’ll get another License Agreement.
===============================================================================
License Agreement
-----------------

Installation and Use of Adobe LiveCycle Data Services ES Requires Acceptance of the Following License Agreement:
again, eventually
DO YOU ACCEPT THE TERMS OF THIS LICENSE AGREEMENT? (Y/N):
If you accept, then you’ll get a notice that you’ll have a 120-day trial of LCDS, then it will convert to the Express edition. Press Enter to continue.
===============================================================================
Earlier Versions of Adobe ColdFusion installed?
-----------------------------------------------

If you installed an earlier version of ColdFusion on this computer, you can migrate your settings to Adobe ColdFusion 8.

Is there an earlier version of ColdFusion installed on this computer (for example, ColdFusion 6 or ColdFusion MX 7)?

    1- Yes
  ->2- No

ENTER THE NUMBER FOR YOUR CHOICE, OR PRESS <ENTER> TO ACCEPT THE DEFAULT:

===============================================================================
Configure Web Servers
---------------------

Please configure your web server(s).  If you do not configure a web server the
built-in web server will be used on port 8500 or the next available port.

    1- Add Web Server Configuration
  ->2- Continue with installation

Choice: 1

---------------------

  ->1- Apache
    2- Sun ONE Web Server (iPlanet)
    3- Cancel

What kind of web server are you configuring: 1

What directory contains your Apache configuration file (httpd.conf)? (For
   example, on Red Hat Linux it could be located in the /etc/httpd/conf
   directory if you installed from an rpm, or for SuSe Linux, it could be in
   /etc/apache2)

   Directory:
If you installed Apache using the instructions in Part 1, you know that the configuration files for Apache are in /etc/apache2.
---------------------
Where is the Apache program binary file? (For example, on Red Hat Linux it could be /usr/sbin/httpd if you installed from an rpm, or for SuSE Linux it could be located at /usr/sbin/httpd2) If you have more than one instance of Apache on your computer, enter the binary file location for the Apache web server that will use ColdFusion. (Note: this is not the Apache start and stop script.)

   File:
Again, from Part 1, the executable for Apache is found at /usr/sbin/apache2.
---------------------
Where is the control file that you use to start and stop the Apache web server? (For example, this could be /etc/init.d/httpd on Red Hat Linux if you installed from an rpm, /usr/sbin/apache2ctl on SuSe Linux, or it could be /usr/local/apache/bin/apachectl on hand-compiled versions.)

   File:
Per Part 1, this can be found at /usr/sbin/apache2ctl.
---------------------
Please configure your web server(s).  If you do not configure a web server the built-in web server will be used on port 8500 or the next available port.

    1- Add Web Server Configuration
    2- Remove Web Server Configuration
    3- Edit:Apache : /etc/apache2
  ->4- Continue with installation

Choice: 4

===============================================================================
Choose Adobe ColdFusion 8 Administrator Location
------------------------------------------------

Select the location of the web root for Adobe ColdFusion 8. This is where the installer places the Adobe ColdFusion 8 Administrator.

This directory must be the web root for one of the websites to be configured for use with Adobe ColdFusion 8.

Directory: (DEFAULT: /etc/htdocs):
This will be /var/www per Part 1.
===============================================================================
Runtime User
------------

Enter the name of the runtime user.   This user must already exist on the system.

User Name: (DEFAULT: nobody):
This is why we created the user cfserver earlier.
===============================================================================
Administrator Password
----------------------

Enter the password that you will use to restrict access to the ColdFusion
Administrator.

This field is required.

Password:
Enter something you can remember.
===============================================================================
Enable RDS
----------

The ColdFusion Remote Development Service (RDS) lets developers using Adobe tools remotely connect to this server for development purposes. RDS is required for Line Debugging, Report Builder, and DreamWeaver Extensions.

If this is a production server, Adobe recommends that you disable RDS. Note, however, that disabling RDS also disables debugging, the directory browsing applets in the ColdFusion Administrator and some of the functionality in the Report Builder.

Enable RDS  (Y/N): y
Password:
Confirm Password:
Enter Y because at the very least, if you’re not using a ColdFusion debugger yet, you should be.
Final Confirmation
===============================================================================
Installation Confirmation
-------------------------

Installation Type:
  Server configuration

Licensing:
  Developer Edition

Installation Directories:
  Product: /opt/coldfusion8
  Web root: /var/www

Server Information:
  Web Server: Apache (/etc/apache2)
  Port:
  Search Services: installed
  Adobe LiveCycle Data Services ES: installed ( Express edition )
  Documentation: installed
  RDS: enabled

Disk Space Information (for Installation Target):
  Required: 897,623,985 bytes
  Available: 33,589,080,064 bytes
Press enter and wait for the installation process to complete.
===============================================================================
Installing...
-------------

 [==================|==================|==================|==================]
 [------------------|------------------|------------------|------------------]

===============================================================================
Installation Complete
---------------------

You have successfully completed the first step in installing Adobe ColdFusion
8.

To continue with your installation, go to /opt/coldfusion8/bin and type
"./coldfusion start" to start your server.

Once the server, is started log in to the Configuration Wizard at
http://[machinename]/CFIDE/administrator/index.cfm

Press Enter to exit the installer:
Running ColdFusion
In /opt/coldfusion8/bin:
Start CF
amoreno@amoreno-desktop:/opt/coldfusion8/bin$ sudo ./coldfusion start
Starting ColdFusion 8...
The ColdFusion 8 server is starting up and will be available shortly.
======================================================================
Running the ColdFusion 8 connector wizard
======================================================================
Configuring the web server connector (Launched on the first run of the ColdFusion 8 start script)
Running apache connector wizard...
Connector installation succeeded for apache
======================================================================
ColdFusion 8 has been started.
ColdFusion 8 will write logs to /opt/coldfusion8/logs/cfserver.log
======================================================================
Stop CF
amoreno@amoreno-desktop:/opt/coldfusion8/bin$ sudo ./coldfusion stop
Stopping ColdFusion 8, please wait
Stopping coldfusion server.....stopped
ColdFusion 8 has been stopped
Restart CF
amoreno@amoreno-desktop:/opt/coldfusion8/bin$ sudo ./coldfusion restart
Restarting ColdFusion 8...
Stopping ColdFusion 8, please wait
Stopping coldfusion server....stopped
ColdFusion 8 has been stopped
Starting ColdFusion 8...
The ColdFusion 8 server is starting up and will be available shortly.
======================================================================
ColdFusion 8 has been started.
ColdFusion 8 will write logs to /opt/coldfusion8/logs/cfserver.log
======================================================================
ColdFusion Administration
Verify that Apache is running by going to 127.0.0.1. If Apache is running, then go to the ColdFusion Administartor.
If you see a directory listing instead of the CF Admin, then we have to make one small change to the Apache configuration file.
Making index.cfm a Directory Index
Under a normal Apache installation, the DirectoryIndex configuration would be found in the httpd.conf file. Using the version in the Ubuntu repository, we have to look around a bit since many setting have been moved to seperate .conf files.
In this setup, we need to edit a file called dir.conf and add index.cfm to the list of DirectoryIndex files. Add it first so that it overrides all others. Since this file is owned by root, we need to use sudo to edit it.
amoreno@amoreno-desktop:/etc/apache2/mods-available$ sudo vi dir.conf
/etc/apache2/mods-available/dir.conf
<IfModule mod_dir.c>
  DirectoryIndex index.cfm index.html index.cgi index.pl index.php index.xhtml index.htm
</IfModule>
You MUST restart Apache for this change to take effect.
amoreno@amoreno-desktop:/usr/sbin$ sudo apache2ctl restart
apache2: Could not reliably determine the server's fully qualified domain name, using 127.0.1.1 for ServerName
Back to the ColdFusion Administrator
Reload the ColdFusion Administrator and you should get the Login screen for the CF Admin. Enter your password to continue. As this is the first time the Admin is being accessed, it will run some setup scripts before you get the main page. Once the setup scripts have run, you can browse around the Administration sections.
Starting ColdFusion on Bootup
Update 11-13-2008:
If you want CF to start automatically, Save Ferguson posted how to automatically start ColdFusion on Boot with Ubuntu.
Moving on
Now we have 64-bit Java, 64-bit Apache and 64-bit ColdFusion up and running. In part 3, we’ll install 64-bit MySQL and then Eclispe with CFEclipse in part 4.
Adrian J. Moreno
Adrian is a CTO and solution architect specializing in software modernization. More information