The ACME Guide: 64-bit Ubuntu 8.04 LTS Hardy Heron Edition - Part 1
Posted on June 6, 2008
I’ve always appreciated the effort that Stephen Collins put into creating The ACME Guide, which takes you through the steps of setting up a local ColdFusion development environment. This is my walk through of setting up the latest and greatest ACME stack under 64-bit Ubuntu 8.04.
These instructions should work just as well for the 32-bit versions of Ubuntu 8.04 or Ubuntu 7.10.
What the heck is ACME
Tons of people have heard of the LAMP stack:
- Linux
- Apache
- MySQL
- PHP
As fas as I know, Stephen Collins from ACID Labs was the first to talk about the ACME stack:
- Apache
- ColdFusion
- MySQL
- Eclipse
Ubuntu 8.04 LTS Hardy Heron
If you haven’t installed Ubuntu 8.04 yet, you can download it or order a CD from http://www.ubuntu.com/.
You don’t have to create a new partition or a new hard drive to install Ubuntu 8.04. It ships with an installation program called Wubi that allows you to install Ubuntu onto an existing Windowsinstallation just like you would any Windows program.
When you start your computer, you get the option to boot into Windows or Linux as you please. You can later uninstall it with no affect to your Windows OS.
Alternately, you can install it in Windows using VMWare Server. Follow the link for the free download and instructions.
So, now that you’ve got Ubuntu installed, let’s get started.
Step 0: Install 64-bit Java
In the upper left-hand corner, click on Applicationsm, then select Add/Remove Applications.
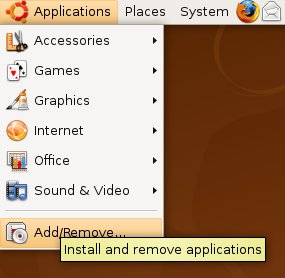
In this window, select Show “All available applications” and then Search for “java”. You should get a list of all available applications that run on java. Check the box for Sun Java 6 Runtime, then click “Apply Changes”.

DO NOT select the Eclipse install from this list. In ubuntu 7.10 they only offered Eclipse 3.2 and I’m not sure if they’ve updated it yet. We’ll be installing 3.3 later.
Once this has finished installing, you can verify by opening up a terminal and typing “java -version”.
amoreno@amoreno-desktop:~$ java -version
java version "1.6.0_06"
Java(TM) SE Runtime Environment (build 1.6.0_06-b02)
Java HotSpot(TM) 64-Bit Server VM (build 10.0-b22, mixed mode)
amoreno@amoreno-desktop:~$
Step 1: Apache
While 64-bit ColdFusion will work with 32-bit Apache just fine, we’ll be installing the 64-bit version of Apache 2.2 from Ubuntu’s package manager.
From the top menu, go to System > Administration > Synaptic Package Manager. You’ll be prompted for your admin password to continue.
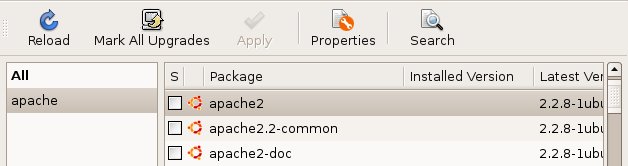
Click the Search icon, enter “apache” and click “Search”. You’ll get a list of Apache projects. Scroll down to the option “apache2”, click the checkbox and select “Mark for Installation”. Another dialog will pop up asking if you want to “Mark additional required changes?”. Click “Mark” and all the related packages for Apache will be installed.
Click on the big green “Apply” check mark and you’ll get another dialog with info on what’s being installed. Click “Apply” and the installation will begin. Click “Close” when it’s done.
Web root
Open your browser and go to http://127.0.0.1/. If you get the message It works!, then Apache was successfully installed.
The root of the default website can be found at /var/www/. The default index.html page contains the “It works!” message.
amoreno@amoreno-desktop:/var/www$ ls -l
total 4
-rw-r--r-- 1 root root 45 2008-06-02 23:03 index.html
Verify Apache version
To verify the version of Apache that’s been installed, go to the /user/sbin/ directory and ask for the file information.
amoreno@amoreno-desktop:~$ cd /usr/sbin/
amoreno@amoreno-desktop:/usr/sbin$ file apache2
apache2: ELF 64-bit LSB executable, x86-64, version 1 (SYSV), for GNU/Linux 2.6.8, dynamically linked (uses shared libs), stripped
Apache as Ubuntu Service
Now that Apache is installed, it is setup under Ubuntu as a Service. Services in Linux work the same as they do in Windows. Apache will start automatically when Ubuntu starts. If you only want it running when you’re developing, follow these instructions.
In the top menu, go to System > Administration > Services. You may have to click an “Unlock” button and enter your password to alter these settings.
Scroll down to Web Server (apache2) and remove the check mark next to it. Click “Close” and Apache will not run automatically from now on.
Administration of Apache
The controls for apache can be found in /user/sbin/
amoreno@amoreno-desktop:/usr/sbin$ ls -l apache*
-rwxr-xr-x 1 root root 423144 2008-05-14 02:09 apache2
-rwxr-xr-x 1 root root   4387 2008-05-14 01:58 apache2ctl
amoreno@amoreno-desktop:/usr/sbin$
Since it’s already running, let’s stop Apache.
amoreno@amoreno-desktop:/usr/sbin$ apache2ctl -k stop
apache2: Could not reliably determine the server's fully qualified domain name, using 127.0.1.1 for ServerName
httpd (pid 10208?) not running
amoreno@amoreno-desktop:/usr/sbin$
If you check http://127.0.0.1/, you’ll see that the server is still running.
Apache is controlled by the root user, not by the user you created to log into ubuntu. In order to start or stop the web server, you have to be logged into ubuntu as root OR you can use the sudo command to passively log in as root for the duration of command line session.
So let’s try to stop Apache using sudo.
amoreno@amoreno-desktop:/usr/sbin$ sudo apache2ctl -k stop
apache2: Could not reliably determine the server's fully qualified domain name, using 127.0.1.1 for ServerName
amoreno@amoreno-desktop:/usr/sbin$
Now if you check http://127.0.0.1/, you’ll find that the server has been stopped.
Start it up again.
amoreno@amoreno-desktop:/usr/sbin$ sudo apache2ctl -k start
apache2: Could not reliably determine the server's fully qualified domain name, using 127.0.1.1 for ServerName
amoreno@amoreno-desktop:/usr/sbin$
Whenever you make a change to Apache’s configuration files, you’ll have to restart the server to apply those changes. Rather than calling stop and start, you can just call restart.
amoreno@amoreno-desktop:/usr/sbin$ sudo apache2ctl -k restart
apache2: Could not reliably determine the server's fully qualified domain name, using 127.0.1.1 for ServerName
amoreno@amoreno-desktop:/usr/sbin$
Configuring Apache
The configuration files for Apache can be found in /etc/apache2/.
The apache2 package for ubuntu has some slight alterations from the standard installation.
amoreno@amoreno-desktop:/etc/apache2$ ls -l
total 40
-rw-r--r-- 1 root root 10587 2008-05-14 01:58 apache2.conf
drwxr-xr-x 2 root root  4096 2008-06-02 23:03 conf.d
-rw-r--r-- 1 root root   378 2008-05-14 01:58 envvars
-rw-r--r-- 1 root root     0 2008-06-02 23:03 httpd.conf
drwxr-xr-x 2 root root  4096 2008-06-02 23:03 mods-available
drwxr-xr-x 2 root root  4096 2008-06-02 23:03 mods-enabled
-rw-r--r-- 1 root root    59 2008-05-14 01:58 ports.conf
drwxr-xr-x 2 root root  4096 2008-06-02 23:03 sites-available
drwxr-xr-x 2 root root  4096 2008-06-02 23:03 sites-enabled
apache2.conf is the Primary Configuration File.
httpd.conf contains user configurations.
ports.conf contains ports listings.
The directory conf.d/ can contain generic configuration snippets.
Virtual Hosts are configured in the folders sites-available or sites-enabled, but Apache only loads Virtual Hosts that are stored in the sites-enabled directory. There is no vhosts.conf file.
amoreno@amoreno-desktop:/etc/apache2$ cd sites-available/
amoreno@amoreno-desktop:/etc/apache2/sites-available$ ls -l
total 4
-rw-r--r-- 1 root root 985 2008-05-14 01:58 default
The default website is configured in this file named default (no file extension). You can copy and alter this file to create new Virtual Host entries.
Moving on
Let’s not worry about configuring Virtual Host entires right now. We’ve still got a ways to go. After we get the rest setup, we’ll go over creating Virtual Host (web site) entries.
In Part 2, we’ll install ColdFusion 8.0.1 with all of its 64-bit goodness.
Adrian J. Moreno
Adrian is a CTO and solution architect specializing in software modernization. More information